In the Optic and Photonic industry, the Optical Surface Quality is a fundamental evaluation parameter that describes the cosmetic appearance of the surface of optical components and can be considered as a tolerance for imperfections.
The specifications used for the Surface Quality control are described by quality standards which also list the methods for the identification, characterization and tolerance to scratches, cavities, stains or bubbles present on the optical surfaces.
Surface imperfections
There are different kinds of surface imperfections, some are purely cosmetic and do not affect the system performance; some defects can cause a small loss in system throughput and a small increase in scattered light; some others can cause increased absorption of energy, damage the optic, impede the functionality of the optical system or drastically reduce its performance.
Type of Imperfections

The most common defects are classified as scratches, marks on the surface with one dimension (usually the length) longer than the other; pits, that are microscopic holes on the external surface, mainly circular; digs, wider pits; bubbles, bumps on the surface due to an excess of material on it.
Imperfections have different causes and can depend from the quality of material used, from manipulation, manufacturing processes, included grinding, polishing and coating; even during the cleaning process and the final handling for packaging the surface can be damaged.
Parameters of acceptance in relation to the application
The greatest challenge for Manufacturers of Precision Optics is to grant an appropriate surface quality at the right price; the parameters of acceptance for imperfections is in fact a compromise between costs and performances, too tight tolerance increases manufacturing costs and too loose will affect quality of optical components.
For this reason tolerances for each imperfection have been defined by standards, in relation to the application of the optical component:
- Laser or intense heat applications require an higher precision quality and a surface with limited and smaller imperfections due to possible nucleation sites that can appear in small cracks or imperfections;
- Optics used with UV wavelengths require tighter surface quality tolerances than optics used with visible or IR systems, because shorter wavelengths experience higher amounts of scatter;
- Components used in standard scientific applications for low to moderate power laser or imaging, which tolerate little scattered light, require a moderate level of imperfection;
- Commercial quality, used for non-critical low power laser and imaging applications, where scattered light is not as important as cost, can have a lower surface quality.

Surface quality Standards
The Optical Surface Quality standards have been defined to provide definitions for imperfection and methods to control them. Standards define the tolerances on the number and severity of imperfections. Two are the main Surface Quality Standards: MIL-PRF-13830B and ISO 10110-7.
MIL-PRF-13830B
The Standard MIL-PRF-13830B is a Military Performance Specification; it takes the visual approach to the inspection and it sets out two optional methods for inspection: reflected light inspection and transmitted light inspection. The resultant is not an exact measurement due to the qualitative evaluation that can vary from inspector to inspector but it is still widely adopted.

The defects are ranked by comparing one by one scratches and digs of the examined optical surface to a set of standard scratches and digs under controlled lighting conditions.
The standard-MIL describes surface quality using two numbers: the first indicating the brightness of scratches (among 10, 20, 40, 60 or 80), the second indicating the diameter of digs (among these 5, 10, 20, 40, 50).
Scratch-dig specifications of 80-50 (where 8 microns is the maximum amplitude allowed for the scratch and 0.50 mm is the maximum diameter allowed for a dig) are typically considered commercial quality, 60-40 are considered standard quality, 20-10 are classified as precision quality, typically require for precision laser applications; most demanding laser applications, such as intra-cavity laser optics, usually require a scratch-dig of 10-5.
To evaluate the quality of the surface the Quality Control inspector must:
- assign a number of brightness and a diameter to each scratch and dig
- count the total number of defects
- evaluate proximity of imperfections of the active regions
- evaluate if the optic passed or failed the inspection.
Standard ISO 10110-7
The Standard ISO 10110-7, released in 2017 by the International Standards Organization, is the latest internationally recognized standard for optical surface quality; it has a more quantitative approach because it takes both visual and dimensional approaches to the inspection; but it is more time-consuming and expensive.
The Standard-ISO describes surface quality using two numbers: the first indicating the maximum amount of imperfections allowed and the second indicating the grade, corresponding to the maximum allowed square root area of imperfections.
The visual inspection approach is similar to the one used in the Standard-MIL with small differences, for example it does not distinguish between scratches and digs but between long and localized imperfections, that can lead to a different result from the Standard-MIL. The dimensional inspection approach it requires that each imperfection is define by several dimensions to determine their grade.
Our Surface Quality Process
In Tecnottica we have a department specifically dedicated to the Surface Quality Control composed by specialized operators, with more than 20 years of experience, that examine and inspect all optics components ensuring all specifications are met.
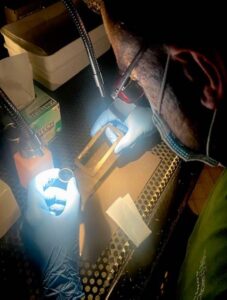
Our Inspectors identify, quantify and measure imperfections of each component with a magnifying lens and loupes in a dark room under a laminar flow box, to reduce the contribution of disturbance from dust, using a fiber lamp in white light.

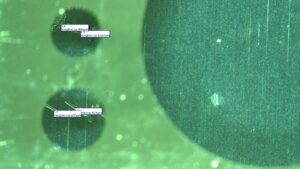
In case the customer’s specifications require a high surface quality and minimum tolerances, the operator analyzes the entire surface with the microscope connected to the PC equipped with a software for the analysis of the area.
In case the number of allowable defects has been exceeded, we evaluate how to proceed and eliminate each imperfection to obtain a positive evaluation of the optical surface and pass the process. For example we can apply multiple grinding and polishing processes that will remove or reduce most of the surface damages and exciding material.
To meet the increasingly challenging requests of customers to produce optical components for applications that require ever greater precision, at Tecnottica we continue to specialize and train as technicians in the sector to perform each inspection in the best possible way, keeping up with updates from the world of precision optics.
